Configure DNS with Ubiquiti Security Gateway using dnsmasq

I'm running a pretty advanced Ubiquiti network for my home with four remote sites using the automatic Site-to-Site VPN. The network was deployed in 2018 and has been running very stable since then.
A couple of days ago I had to change the DNS on one of the remote sites (Note: no DNS via Site-to-Site VPN yet. All gateways handle the DNS for their clients.). Changing DNS in the Security Gateway (USG) can be a confusing process. Dnsmasq with Ubiquiti is not very well documented and it is very easy to get lost. Therefore I was thinking to write something on this matter.
I am running one Ubiquiti Security Gateway Pro on each site. I have enabled Dnsmasq on all of our USG. It was possible to enable dnsmasq using the GUI before but the Dnsmasq alternative has been removed both in the new and legacy GUI. In order to enable it you have to SSH into the USG and run the following commands (read more here):
configure
set service dhcp-server use-dnsmasq enable
commit
save
exit
However, knowing Ubiquiti there is a chance that this will not be preserved through rebooting or updating the USG. Therefore I suggest actually enabling this within the config.gateway.json file.
If you don't know what a config.gateway.json file is, it's really simple. When the USG starts up it connects to the UniFi controller. If config.gateway.json exists on the controller the USG will pull the file, load and merge it automatically with the current running configuration. Neat, right? So how do we do this?
First of all, we have to check what ID our site has. For most people this is gonna be "default", but if you have several sites like me it's always best to actually verify what the ID is. Login to your controller via SSH and browse to your UniFi controller interface. In the URL you will either see "default" or an ID containing some gibberish.


Now we know what the ID is. Log in to the UniFi controller (not USG) and create a file using the below code. Note that you want to change "default" to your ID.
vi /srv/unifi/data/sites/default/config.gateway.json
and paste the following into the config.gateway.jsonfile:
{
	"service": {
		"dhcp-server": {
			"use-dnsmasq": "enable"
		}
	}
}
It's ALWAYS a good idea (trust me, I've learned the hard way) to verify that the config.gateway.json is indeed formatted correctly by running the below.
python -m json.tool /srv/unifi/data/sites/default/config.gateway.json
So why do you want to use dnsmasq? Well, Ubqituiti is great but their built-in DNS service just sucks. The devices on the network do not register their hostname in Ubiquiti's standard DNS. This leaves us with two options; 1) Use dnsmasq on USG , 2) Set up a standalone DNS server on another server.
Since I am not really in the mood of setting up a DNS server I am gonna go with alternative 1. When you've enabled dnsmasq it automatically listens on 127.0.0.1. So how do we configure the DNS? Well, first of all, we need to actually add the forwarding server to the configuration. In this example, I am gonna use Google's DNS. We want to paste the configuration into the config.gateway.json as before, otherwise, there is always a risk that the configuration is removed when rebooting or updating the device. Add the following to the config.gateway.jsonfile:
{
	"service": {
		"dhcp-server": {
			"use-dnsmasq": "enable"
		},
		"dns": {
			"forwarding": {
				"options": [
					"strict-order",
					"expand-hosts",
					"server=8.8.8.8"
				]
			}
		}
	}
}
Okay, so now we have set up dnsmasq with 8.8.8.8 as the forwarding server. Now we need to configure the WAN and the DHCP scope in order for the clients to start using the DNS settings.
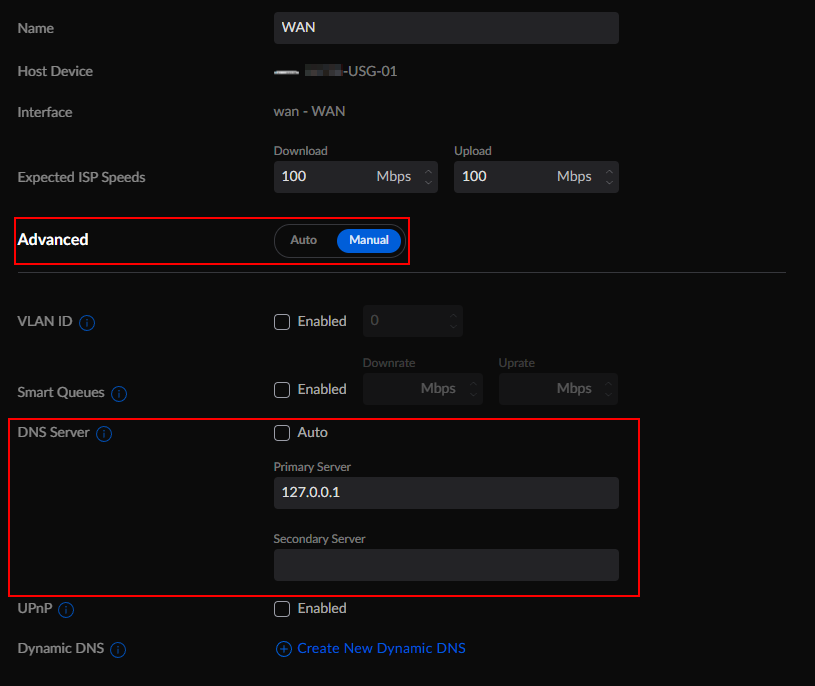
Remember what I said before? Dnsmasq runs and listens by default on 127.0.0.1 therefore it seems logical to actually set this IP address in the WAN configuration to forward the clients to Google's DNS. Let's do this by browse to Settings > Internet > WAN and change the DNS Server to 127.0.0.1.
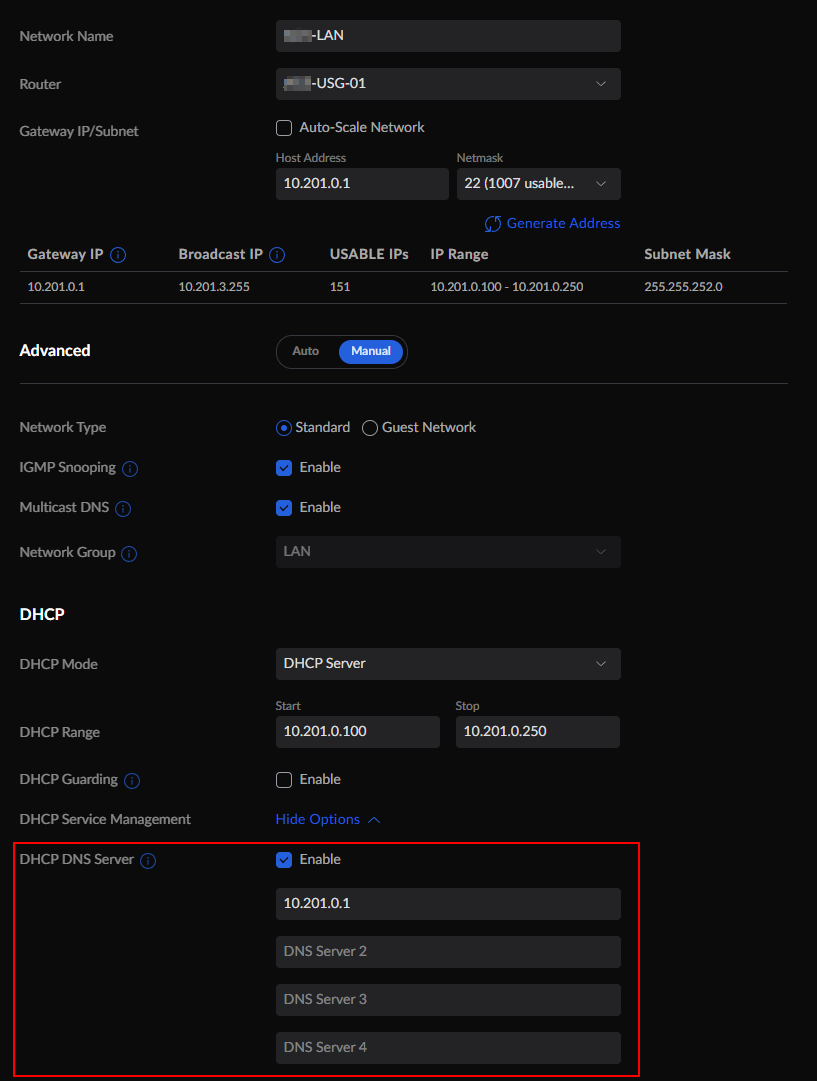
Now we want the clients to actually use the default gateway as DNS server. Assuming you're using DHCP in the UniFi controller browse to Settings > Networks > LAN and change the DHCP DNS Server to your USG Gateway IP. In my case this is 10.201.0.1.
Now we're all done with the configuration. It is a best practice to restart all of the client devices after changing the DNS.
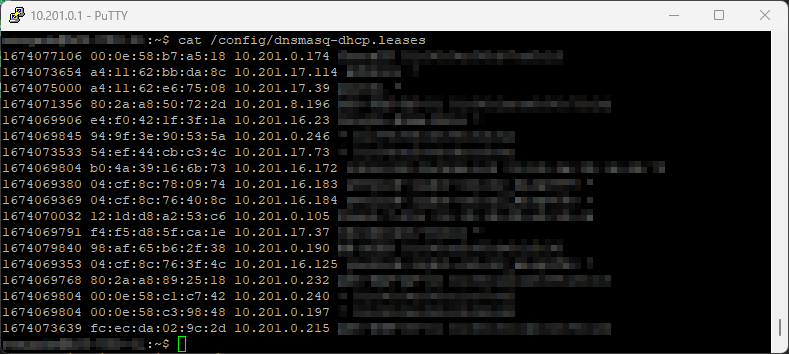
But how do we verify that it actually works? Dnsmasq is by default using the file dnsmasq-dhcp.leaseson the USG located at /config/dnsmasq-dhcp.leases. We can simply log in to our USG with SSH and look if our clients register their hostnames in this file using cat /config/dnsmasq-dhcp.leases. It should look something like below.
If the file is not updated with any records it could be a good idea to reload the dnsmasq cache by running sudo /etc/init.d/dnsmasq force-reload.
Tips and tricks
#1 Flush the dnsmasq cache
Sometimes the dnsmasq cache gets cluttered. If that happens it could be a good idea to refresh the cache. It can easily be done by simply stopping the dnsmasq service, removing the file dnsmasq-dhcp.leases and then starting the service again. We run sudo /etc/init.d/dnsmasq force-reload in order to rebuild the cache.
sudo /etc/init.d/dnsmasq stop
sudo mv /config/dnsmasq-dhcp.leases /config/dnsmasq-dhcp.leases-bak20230117
sudo /etc/init.d/dnsmasq start
sudo /etc/init.d/dnsmasq force-reload

cat /config/dnsmasq-dhcp.leases
If you just want to remove one record you do exactly the same as above, but instead of moving the file edit it with with vi using the following command sudo vi /config/dnsmasq-dhcp.leases and simply remove the line with dd.
#2 Add a static DNS record
If you want to add a static DNS record the easiest way is probably to add it into config.gateway.json.
vi /srv/unifi/data/sites/default/config.gateway.json
and paste the following into the config.gateway.jsonfile:
{
	"service": {
		"dhcp-server": {
			"use-dnsmasq": "enable"
		},
		"dns": {
			"forwarding": {
				"options": [
					"strict-order",
					"expand-hosts",
                    "host-record=something.example.com,10.201.X.X",
					"server=8.8.8.8"
				]
			}
		}
	}
}
Always validate the config.gateway.json using the below:
python -m json.tool /srv/unifi/data/sites/default/config.gateway.json
#3 Add a local domain name
As I said at the beginning of the post, my Ubiquiti deployment consists of several sites. All of the sites use their local USG for DNS. However, I want to be able to ping or connect to the other sites using the Fully Qualified Domain Name (FQDN). It's really easy to continue to add a local domain in Ubiquiti.
First, assume that we have two sites - Site1 and Site2. On Site1 we add the local domain name site1.example.comand on Site2 we add the local domain name site2.example.com. Site1 already knows the IP addresses of all of its clients, right? It just looks in the dnsmasq cache and if it finds the record it sends it back to the client asking for it. But how do we resolve the DNS if we are on Site1 and want to ping a client on Site2? Well, then we have to add the forwarding server of the other USG on Site2 that actually knows about the client's DNS.
So how do we configure this? First, add the local domain name to all networks in Site1 by browsing to Settings > Networks > LAN and add it under Domain Name. Then redo the process for Site2.

Then we need to configure the config.gateway.json for Site1 by adding the following:
{
	"service": {
		"dhcp-server": {
			"use-dnsmasq": "enable"
		},
		"dns": {
			"forwarding": {
				"options": [
					"strict-order",
					"expand-hosts",
                    "host-record=something.example.com,10.201.X.X",
                    "domain=site1.example.com",
					"local=/site1.example.com/",
                    "server=/site2.example.com/[email protected]",
					"server=/0.201.10.in-addr.arpa/[email protected]",
					"server=8.8.8.8"
				]
			}
		}
	}
}
Respectively, we need to add a similar configuration in config.gateway.json for Site2:
{
	"service": {
		"dhcp-server": {
			"use-dnsmasq": "enable"
		},
		"dns": {
			"forwarding": {
				"options": [
					"strict-order",
					"expand-hosts",
                    "host-record=something.example.com,10.201.X.X",
                    "domain=site2.example.com",
					"local=/site2.example.com/",
                    "server=/site1.example.com/[email protected]",
					"server=/0.200.10.in-addr.arpa/[email protected]",
					"server=8.8.8.8"
				]
			}
		}
	}
}
With the above configuration, we have managed to send the DNS request to the correct DNS server.